Меню Закрыть

Установка elasticsearch на windows

Содержание

Elasticsearch can be installed on Windows using the .zip package. This comes with a elasticsearch-service.bat command which will setup Elasticsearch to run as a service.

The latest stable version of Elasticsearch can be found on the Download Elasticsearch page. Other versions can be found on the Past Releases page.

Elasticsearch requires Java 8 or later. Use the official Oracle distribution or an open-source distribution such as OpenJDK.

Download and install the .zip package

Unzip it with your favourite unzip tool. This will create a folder called elasticsearch-5.3.3 , which we will refer to as %ES_HOME% . In a terminal window, cd to the %ES_HOME% directory, for instance:

Running Elasticsearch from the command line

Elasticsearch can be started from the command line as follows:

By default, Elasticsearch runs in the foreground, prints its logs to STDOUT , and can be stopped by pressing Ctrl-C .

Configuring Elasticsearch on the command line

Elasticsearch loads its configuration from the %ES_HOME%configelasticsearch.yml file by default. The format of this config file is explained in Configuring Elasticsearch.

Any settings that can be specified in the config file can also be specified on the command line, using the -E syntax as follows:

Values that contain spaces must be surrounded with quotes. For instance -Epath.logs="C:My Logslogs" .

Typically, any cluster-w >cluster.name ) should be added to the elasticsearch.yml config file, while any node-specific settings such as node.name could be specified on the command line.

Checking that Elasticsearch is running

You can test that your Elasticsearch node is running by sending an HTTP request to port 9200 on localhost :

which should give you a response something like this:

Installing Elasticsearch as a Service on Windows

Elasticsearch can be installed as a service to run in the background or start automatically at boot time without any user interaction. This can be achieved through the elasticsearch-service.bat script in the bin folder which allows one to install, remove, manage or configure the service and potentially start and stop the service, all from the command-line.

The script requires one parameter (the command to execute) followed by an optional one indicating the service id (useful when installing multiple Elasticsearch services).

The commands available are:

Install Elasticsearch as a service

Remove the installed Elasticsearch service (and stop the service if started)

Start the Elasticsearch service (if installed)

Stop the Elasticsearch service (if started)

Start a GUI for managing the installed service

Based on the architecture of the available JDK/JRE (set through JAVA_HOME ), the appropriate 64-bit(x64) or 32-bit(x86) service will be installed. This information is made available during install:

While a JRE can be used for the Elasticsearch service, due to its use of a client VM (as opposed to a server JVM which offers better performance for long-running applications) its usage is discouraged and a warning will be issued.

The system environment variable JAVA_HOME should be set to the path to the JDK installation that you want the service to use. If you upgrade the JDK, you are not required to the reinstall the service but you must set the value of the system environment variable JAVA_HOME to the path to the new JDK installation. However, upgrading across JVM types (e.g. JRE versus SE) is not supported, and does require the service to be reinstalled.

Читайте также:  Core 2 duo t8400

Customizing service settings

The Elasticsearch service can be configured prior to installation by setting the following environment variables (either using the set command from the command line, or through the System Properties->Environment Variables GUI).

A unique >elasticsearch-service-x86 (on 32-bit Windows) or elasticsearch-service-x64 (on 64-bit Windows).

The user to run as, defaults to the local system account.

The password for the user specified in %SERVICE_USERNAME% .

The name of the service. Defaults to Elasticsearch %SERVICE_ID% .

The description of the service. Defaults to Elasticsearch Windows Service — https://elastic.co .

The installation directory of the desired JVM to run the service under.

Log directory, defaults to %ES_HOME%logs .

Data directory, defaults to %ES_HOME%data .

Configuration file directory (which needs to include elasticsearch.yml and log4j2.properties files), defaults to %ES_HOME%conf .

Any additional JVM system properties you may want to apply.

Startup mode for the service. Can be either auto or manual (default).

The timeout in seconds that procrun waits for service to exit gracefully. Defaults to 0 .

At its core, elasticsearch-service.bat relies on Apache Commons Daemon project to install the service. Environment variables set prior to the service installation are copied and will be used during the service lifecycle. This means any changes made to them after the installation will not be picked up unless the service is reinstalled.

On Windows, the heap size can be configured as for any other Elasticsearch installation when running Elasticsearch from the command line, or when installing Elasticsearch as a service for the first time. To adjust the heap size for an already installed service, use the service manager: binelasticsearch-service.bat manager .

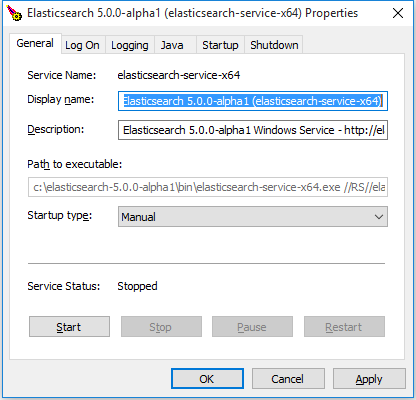
Most changes (like JVM settings) made through the manager GUI will require a restart of the service in order to take affect.

Directory layout of .zip archive

The .zip package is entirely self-contained. All files and directories are, by default, contained within %ES_HOME% — the directory created when unpacking the archive.

This is very convenient because you don’t have to create any directories to start using Elasticsearch, and uninstalling Elasticsearch is as easy as removing the %ES_HOME% directory. However, it is advisable to change the default locations of the config directory, the data directory, and the logs directory so that you do not delete important data later on.

home

Elasticsearch home directory or %ES_HOME%

Directory created by unpacking the archive

bin

Binary scripts including elasticsearch to start a node and elasticsearch-plugin to install plugins

conf

Configuration files including elasticsearch.yml

data

The location of the data files of each index / shard allocated on the node. Can hold multiple locations.

logs

Log files location.

plugins

Plugin files location. Each plugin will be contained in a subdirectory.

repo

Shared file system repository locations. Can hold multiple locations. A file system repository can be placed in to any subdirectory of any directory specified here.

Встал вопрос централизованного хранения и обработки журналов с серверов на базе Linux и Windows. Мой выбор пал на продукты от Elastic.
Большинство прочитанных статей на тему установки приложений Elastic показались мне достаточно расплывчатыми и неполными.

Основной и единственный источник информации, который я использовал: www.elastic.co/guide/index.html.

Этот мануал конечно не является исчерпывающим, но является достаточным для первоначальной установки и настройки рабочего лог-сервера elasticsearch+logtash+kibana4+beats (windowslinux-агенты).

Подробная информация, дополнительные возможности, а также «реал кунг-фу» доступны в официальной документации.

Будем собирать и склеивать

  • Logstash-2.2.0 — обработка входящих логов
  • Elasticsearch-2.2.0 — хранение логов
  • Kibana-4.2.2 — web-интерфейс
  • Topbeat 1.1.0 — Получение данных об инфраструктуре Linux-систем
  • Filebeat 1.1.0 — Отображение логов в режиме real-time Linux-систем
  • Packetbeat 1.1.0 — Анализ пакетных данных в сети Linux-систем
  • Winlogbeat 1.1.0 — Анализ журналов Windows-систем.
  • Операционная система — Ubuntu Server 14.04 (trusty) x86_x64

Описывать установку Ubuntu Server я не буду, на тему этого доступна исчерпывающая информация в сети.

Подготовка

Редактируем hosts и hostname:

Устанавливаем Java 8:

Создаём каталоги, которые нам понадобятся для фасовки пакетов:

Идём на сайт www.elastic.co/downloads/elasticsearch и скачиваем актуальную (2.2.0) версию:

Редактируем конфиг /etc/elasticsearch/elasticsearch.yml:

Раскомментируем и отредактируем стоки cluster.name и node.name:

(вместо «elk-server.ss.lu» и «mynodename» можете вставьте свои значения)
Должно получится так:

cluster.name: elk-server.ss.lu
node.name: mynodename

Добавляем в автозагрузку:

Скачиваем актуальную (2.2.0) версию Logstash www.elastic.co/downloads/logstash и устанавливаем:

Создаём INPUT-файл для «битсов»…

… и копируем туда код:

Это будет означать что logstash начнёт слушать порт 5044. Данный порт является по умолчанию для этой версии и будет прописан по умолчанию в битсах. Можете задать любой другой.

… и копируем туда код для связи с elasticsearch:

Проверяем конфиг на ошибки, запускаем, и вносим в автозапуск:

Пример успешной работы:

Скачиваем и устанавливаем публичный ключ:

Обновляем репозиторий и устанавливаем:

Нас просят создать первый индекс, но мы пока оставляем всё как есть и переходим к настройке клиентов.

Ставим на клиенты. Для начала, на сервер скачаем и поставим несколько готовых дашбордов Kibana с индексами Beats:

И видим что были добавлены дашборды Kibana с индексами Beats:

Получение данных об инфраструктуре сервера.
Передаёт информацию о работе процессора, использованию памяти. Для каждого процесса отображается информации о родители, pid, состояние и т.д. Также Topbeat позволяет просматривать информацию о файловой системе — состояние дисков, объём свободного пространства и т.д.

Установка (на клиенте):

На сервер нужно добавить шаблоны индексов Topbeat чтобы Elasticsearch стал правильно анализировать информацию на входе:

При успешной загрузки мы должны увидеть:

<"acknowledged":true>

Файл topbeat.template.json создаётся при установке Topbeat и имеет расположение по умолчанию /etc/topbeat/topbeat.template.json. Поэтомоу если на сервере ELK мы по каким то причинам не будем устанавливать клиенты Beats, то нам необходимо будет скопировать этот шаблон с клиента на сервер, либо создать этот файл на сервере и скопировать туда его содержимое (с клиента). И далее его загрузить curl -XPUT ‘адрес_сервер_elk:9200/_template/topbeat’ -d@/PATH/topbeat.template.json.
Но будем считать что Битсы установлены на сервер и имеют следующее месторасположение /etc/topbeat/topbeat.template.json.

Редактируем конфиг (на клиенте):

В блоке output нужно за комментировать обращение к elasticsearch, т.к мы будем использоватеть logstash:

Раскомментируем блок с Logstash, укажем его IP-адресс и порт:

Важно: не используйте табуляцию для передвижения курсора в конфиге! Только пробелы. Иначе получите ошибку:

Если сервер Logstash находится во внешней сети, то на фаерволле удалённого сервера нужно настроить форвардиг порта, в данном случаем 5044 (tcp/udp).
Дополнительные опции логирования хорошо описаны в конфигах.

Открываем интерфейс Kibana и наблюдаем поступающую информацию:

Транслирует на сервер информацию из динамических файлов, которые мы будем указывать:

Добавим индексы на сервере (по аналогии с как мы настраивали Topbeat. Т.е. если на сервере шаблон отсутствует — мы его создаём):

Указываем из каких файлов будем забирать информацию (по умолчанию стоят все файлы из /var/log c расширение .log):

Указываем то, что нужно нам на данном клиенте, например:

Помните про отсутствие табуляции в коде!

Мы также будем использовать logstash для обработки индексов:

Смотрим информацию от Filebeat:

Очень полезный инструмент. Анализирует трафик между серверами. Моментально выявляет ошибки. Анализирует протоколы DNS, HTTP, MySQL, PostgreSQL, КЗС, Memcache и другие.

Настраивается по той же аналогии что и Topbeat/Filebeat:

Редактируем кофиг (комментируем Elasticsearch и настраиваем Logstash)
output:

Идём на сервер и добавляем индекс для Packetbeat:

Скачиваем www.elastic.co/downloads/beats/winlogbeat. Распаковываем в C: и переименовываем в Winlogbeat. Запускаем PowerShell от админа и устанавливаем сервис:

Если мы видим сообщение о том что скрипты отключены в системе по умолчанию (а так оно и будет), то мы просто создаём политику для Winlogbeat:

Перед стартом сервиса правим в конфиге — C:Winlogbeatwinlogbeat.yml.

В блоку event_logs перечислены основные журналы системы, которые нужно транспортировать на Logstash:

В event_logs можно добавить и другие журналы, список которых можно посмотреть так:

Если система выше Vista, то можно указать каналы:

Далее нам нужно загрузить на сервер индексы для winlogbeat как мы это делали для topbeat, filebeat, packetbeat. Это можно сделать удалённо:

Есть есть проблемы такого метода, то можно сделать следующее:

Создаём на сервере файл индекса winlogbeat.template.json
sudo vi

/ELK/releases/beats/winlogbeat/winlogbeat.template.json. На клиенте Windows открываем файл C:winlogbeatwinlogbeat.template.json и копируем его содержимое в файл

Далее (на сервере) загружаем этот индекс на elasticsearch, для того чтобы он смог верно проанализировать информацию и предоставить её привычном формате:
Переходим в каталог где у нас лежит созданный файл winlogbeat.template.json.

На выходе должно быть:

<"acknowledged":true>

Идём на клиент и запускаем сервис winlogbeat. После это начинаем мониторить данные через Kibana, определяя представление по загруженным индексам:

Удаление всех индексов:

Вместо * можно указать неугодный индекс, например:

curl -XDELETE ‘localhost:9200/winlogbeat-2016.02.10’

Для удаление старых логов не обходимо установить «питоновский» модуль:

Если pip не установлен, то устанавливаем:

Посмотерть статус работы Elasticsearch:

Этого достаточно чтобы запустить полноценный лог-сервер, раскидать на клиенты транспортёры и понять принципы.

Дополнительные настройки (оптимизация, настройки geoip и т.д.) описаны в официальной документации и конфигах.

Установка Elasticsearch

В этом разделе мы будем устанавливать Elasticsearch на локальном компьютере в виде одноузлового кластера. Как только мы начнем работу с кластером, мы научимся использовать API-интерфейсы для проверки работоспособности узлов. Разберем как установить в Windows, Mac OS и Debian / RPM .

Установка Java

Elasticsearch — это Java-приложение. Прежде чем мы сможем запустить Elasticsearch, мы должны убедиться, что у нас установлена ​​Java. Вам требуется Java Runtime Environment ( JRE ). Elasticsearch рекомендует Oracle Java Development Kit ( JDK ) 1.8.0_73 или выше. Вы можете проверить версию Java, установленную на вашем компьютере, выполнив следующую команду в командной строке или терминале:

Type Description Default Location Setting

Рекомендуем к прочтению

Добавить комментарий

Ваш адрес email не будет опубликован.