
Содержание
I have configured a VPN gateway and a tunnel, but its not coming up getting below error.
charon: 13[IKE] no IKE config found for 10.0.1.211. 125.17.97.4, sending NO_PROPOSAL_CHOSEN

1 Answer 1
This indicates that there was no match between the algorithms configured on the pair of VPN gateways.
Please note that, In IKEv1, the set of algorithms must be a complete match. In IKEv2, there must be one common algorithm between the two configurations VPN Troubleshooting
a) You should configure:
keyexchange=ike for IKEv1 and IKEv2 support, but initiate with IKEv2.
b) Also, change the ikelifetimefor IKEv2=36000s (10 hrs). You can see all the parameters for VPNs in GCP Supported IKE ciphers
c) Also remember, EAP is not supported on Cloud VPN.
Comments
Copy link Quote reply
maciekish commented Mar 15, 2017 •
Hi, i used this script but cannot connect with the following errors. The server is Ubuntu 16.10 behind NAT with UDP 500 & 4500 forwarded. The client is iOS 10 on a public LTE network.
I find it a bit confusing that there are two external ip’s mentioned. Is my mobile operator doing something funky?
This comment has been minimized.
Copy link Quote reply
maciekish commented Mar 15, 2017
That other 5.79.68.xxx ip was somewhere in netherlands so i blocked it in my firewall for now as it looked very strange and kept coming up even though i stopped trying to connect to my VPN. The log looks like this now:
This comment has been minimized.
Copy link Quote reply
maciekish commented Mar 15, 2017
Seems to start up and find cert fine. I heard iOS is sensitive about the cert but the CN is the same in all places as well as remote id on client.
This comment has been minimized.
Copy link Quote reply
maciekish commented Mar 15, 2017 •
On the iPhone side i can see it doing a DNS lookup, attempting to connect, then failing with Failed to receive IKE Auth Package after a while.
This comment has been minimized.
Copy link Quote reply
jawj commented Mar 15, 2017
Just to check, you’re configuring the iOS client using the profile generated by the script?
I wonder if there’s any issue with your server being behind NAT, but I’m afraid I’m no StrongSwan expert — maybe try one of the StrongSwan support options here: https://www.strongswan.org/support.html
This comment has been minimized.
Copy link Quote reply
maciekish commented Mar 15, 2017
Yes, i tried both the .mobileconfig and entering it manually.
This comment has been minimized.
Copy link Quote reply
maciekish commented Mar 15, 2017
- © 2020 GitHub, Inc.
- Terms
- Privacy
- Security
- Status
- Help
You can’t perform that action at this time.
You signed in with another tab or window. Reload to refresh your session. You signed out in another tab or window. Reload to refresh your session.
В данной статье я поэтапно опишу весь процесс настройки Site-to-Site туннеля между облаком Windows Azure и межсетевым экраном D-Link DFL-210 (актуально для линейки устройств DFL: 210260E800860E)
Внимание! Все этапы настройки сопровождаются большим количеством картинок!
Этап 1. Настройка Windows Azure
Для начала создадим новую виртуальную сеть Windows Azure используя мастер


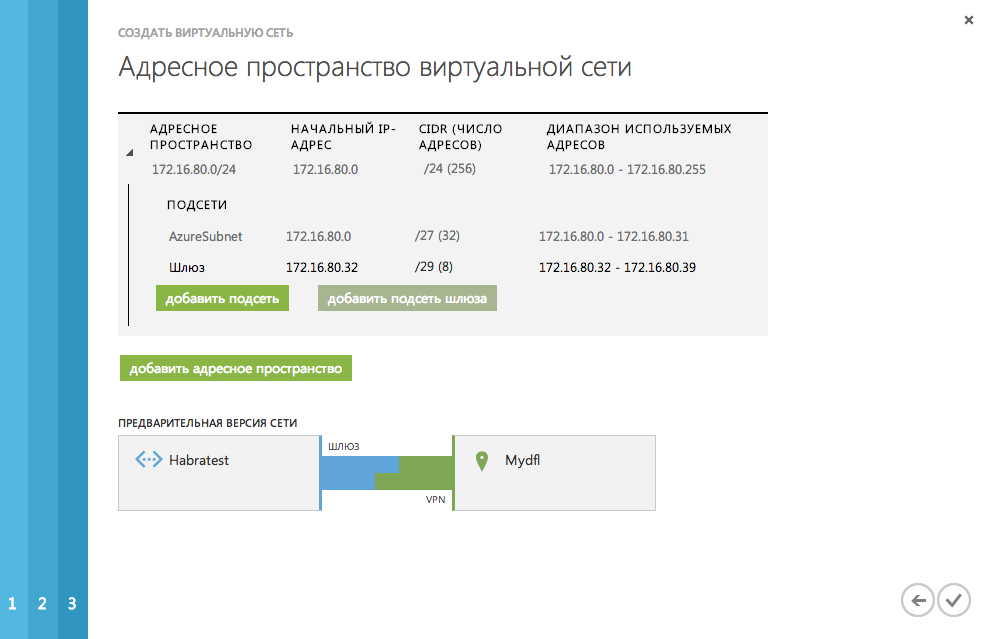
Виртуальная подсеть создана!
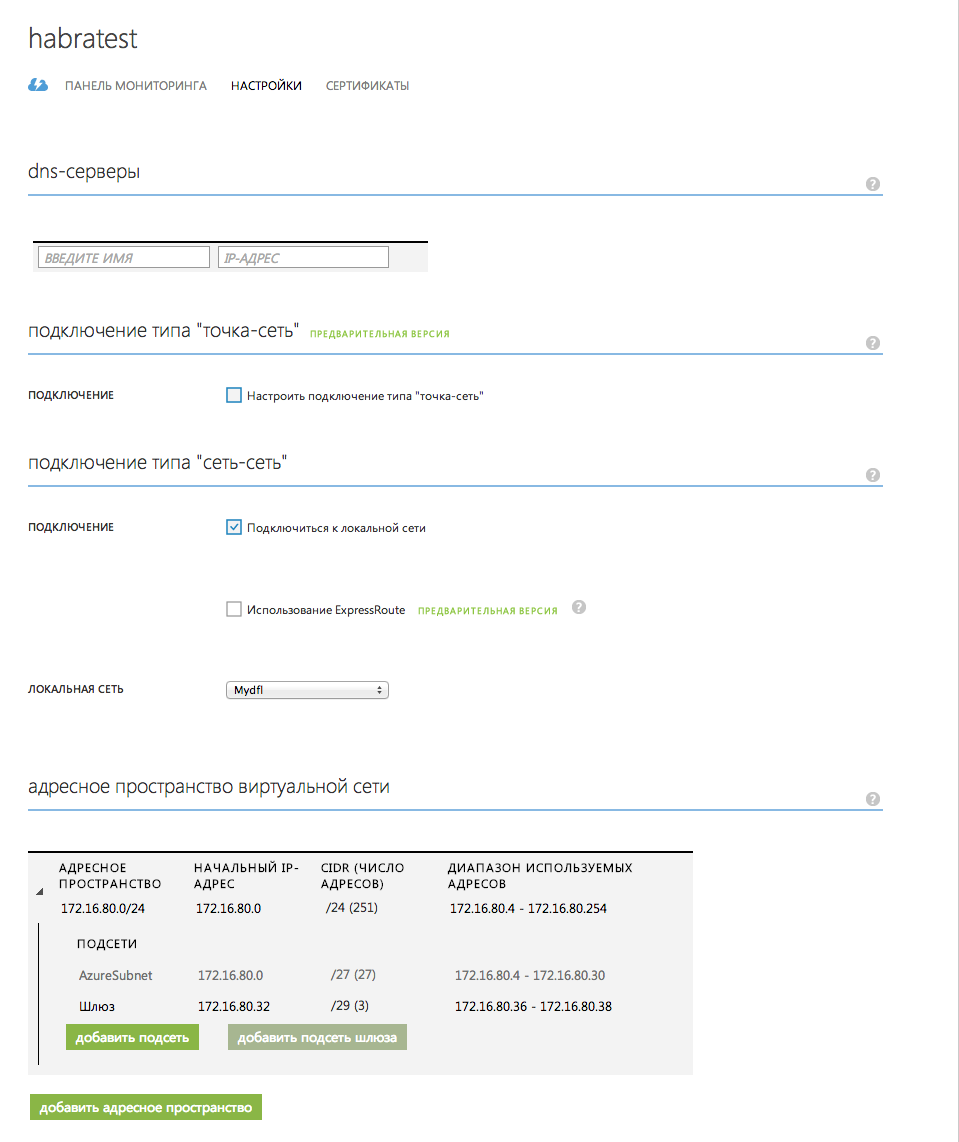
Переходим в "Настройки" вновь созданной виртуальной сети и проверяем, что мы все правильно сделали
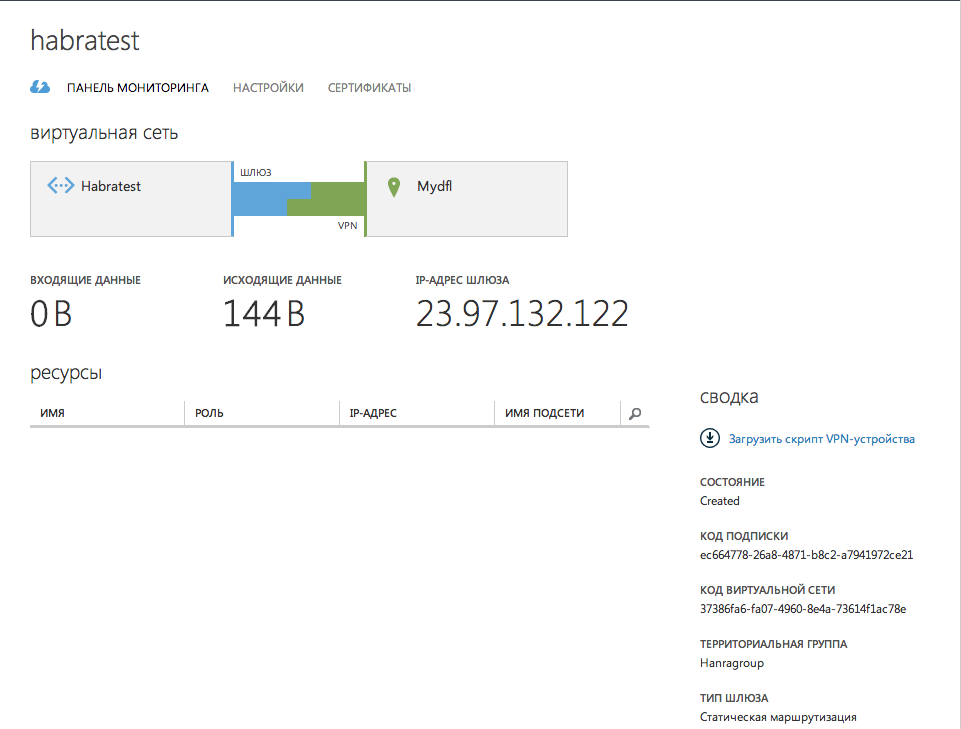
На вкладке "Панель мониторинга" видим следующую картину
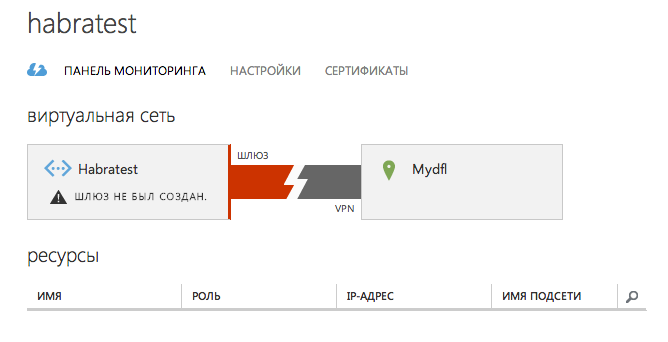

Ждем 10-15 минут пока Windows Azure создаст для нас шлюз
…Прошло от 10 до 15 минут…

Этап 2. Настройка DFL
Здесь надо сделать одно очень важное замечание
В российской прошивке DFL (установлена по умолчанию) не доступны такие замечательные методы шифрования как AES, которые использует Windows Azure (и не только) для своей работы. Обсуждения на эту тему оставим за рамками данной статьи и воспользуемся следующим приемом:
Идем по ссылке http://tsd.dlink.com.tw/
Выбираем из списка свою модель DFL и загружаем самую последнюю WorldWide прошивку для нашего устройства (обозначается «For WW»)
Загружаем прошивку в наш DFL и ждем завершения операции
Прошивка загружена и мы можем продолжать
Теперь давайте добавим все IP-адреса облака в справочник («Objects->Address book->InterfaceAddresses):
Имя: Habratest_cloud_gateway
Значение: 23.97.132.122
Имя: Habratest_cloud_subnet
Значение: 172.16.80.0/24


Теперь переходим непосредственно к созданию правила для IPsec-туннеля («Interfaces->IPsec»):
Вкладка «General»
Имя: Habratest_cloud_IPsec
Local Network: lannet
Remote Network: Habratest_cloud_subnet
Remote Endpoint: Habratest_cloud_gateway
Encapsulation mode: Tunnel (важная настройка!)
IKE Config Mode Pool: None
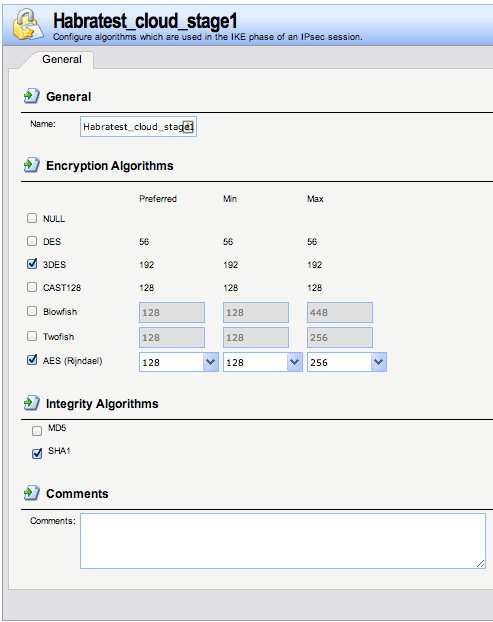
IKE Algorithms: Habratest_cloud_stage1
IKE Lifetime: 28800
IPsec Algorithms: Habratest_cloud_stage2
IPsec Lifetime: 3600 sec
IPsec Lifetime: 102400000 Kb


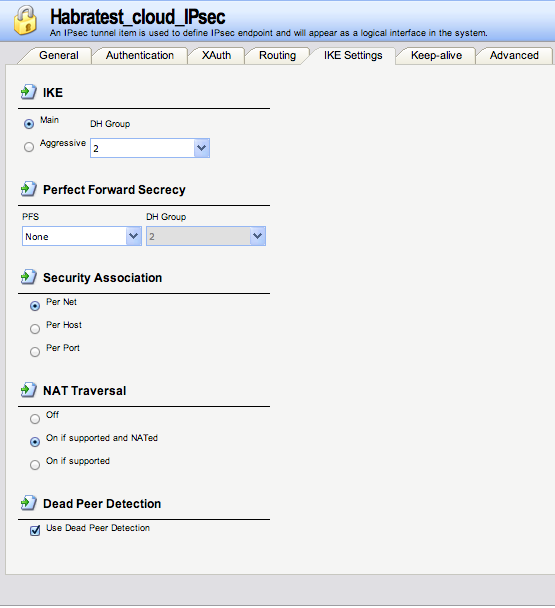


Вот мы и создали основные настройки для туннеля. Теперь сохраняем и применяем внесенные изменения на DFL
Вот и все! Наблюдаем красивые картинки поднятого туннеля

Далее можно создавать необходимые сервисы в Windows Azure (виртуальные машины, базы данных, etc)
Немного о возможных ошибках в логах DFL:
1. statusmsg=«No proposal chosen» — не правильно выбраны методы шифрования
2. reason=«Invalid proposal» — то же, что и п.1
3. reason=«IKE_INVALID_COOKIE» — туннель уже был поднят, но после этого были внесены изменения в его настройки. Заходим на DFL «Status->IPsec->Habratest_cloud_IPsec->справа вверху страницы List all active IKE SAs» и удаляем устаревший IKE SA. Перезагружаем DFL

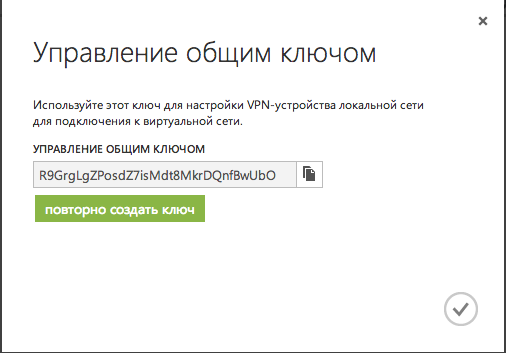
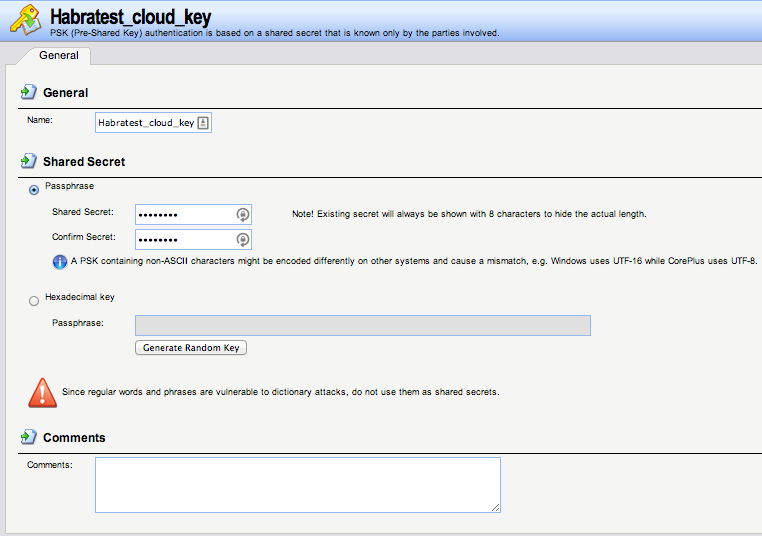
На этом все. Не забудьте поменять тестовые данные из статьи (IP-адреса, подсети, регионы, ключи pre-shared key) на свои